


Special Article - Year 2018 - Volume 33 -
Formal training in two-dimensional standardized photographic documentation during residency in plastic surgery
Treinamento formal em documentação fotográfica bidimensional padronizada durante a residência em cirurgia plástica
ABSTRACT
Introduction: Plastic surgery requires diverse skills,
knowledge, and competencies, and its scope is broad and
challenging. Thus, all plastic surgeons go through extensive
education/training, which begins during residency and
continues throughout their lives. This study aims to outline
a formal training program in 2-dimensional standardized
photographic documentation ("photodocumentation")
to complement surgical and scientific training during
residency in Plastic Surgery.
Methods: The components
(strategies, topics covered, skills acquisition, and feedback
processes) of training in photodocumentation during
residency in Plastic Surgery were detailed.
Results:
Topics in the photodocumentation training program
included resident activities, interactions among residents,
professional photographers, and surgeons/preceptors,
studio settings, cameras, lenses, principles (exposure,
aperture, speed, ISO, and depth of field), lighting,
preparation and positioning of patients and the camera,
photoshoot conditions, photo views, photo database,
image formats, computerized photogrammetry, and
ethical and medical-legal issues.
Conclusion: Training in
photodocumentation complements the arsenal of skills
needed by residents in Plastic Surgery for continuing
education, in order to better prepare them for future careers.
Keywords: Photographs; Teaching; Plastic surgery; Internship and residency; Education
RESUMO
Introdução: A Cirurgia Plástica exige inúmeras habilidades, conhecimentos e competências,
e seu escopo de atuação é amplo e desafiador. Dessa forma, todos os
cirurgiões plásticos passam por uma extensa educação/formação, que se inicia
durante a residência e continua ao longo da vida. O objetivo deste estudo
foi delinear um treinamento formal em documentação fotográfica bidimensional
padronizada para complementar o treinamento cirúrgico e científico durante a
residência em Cirurgia Plástica.
Métodos: Os componentes (as estratégias, os tópicos abordados e os processos de
aquisição de habilidades e feedback) do treinamento em
documentação fotográfica durante a residência em Cirurgia Plástica foram
detalhados.
Resultados: As atividades dos residentes, as interações entre os residentes o fotógrafo
profissional e os cirurgiões/preceptores e os tópicos abordados (estúdio
fotográfico, câmeras fotográficas, objetivas, princípios fotográficos
[exposição, abertura, velocidade, ISO e profundidade de campo], iluminação,
preparo e posicionamento dos pacientes e da câmera fotográfica, situações
fotográficas, vistas fotográficas, banco fotográfico, formatos de imagens,
fotogrametria computadorizada e questões éticas e médico-legais) do programa
de treinamento em documentação fotográfica foram delineados.
Conclusão: O treinamento em documentação fotográfica complementa o arsenal de
habilidades necessários aos residentes de Cirurgia Plástica em formação, com
o intuito de melhor prepará-los para as carreiras futuras.
Palavras-chave: Fotografias; Ensino; Cirurgia plástica; Internato e residência; Educação
INTRODUCTION
In 1955, Sir Harold Gillies, father of modern plastic surgery, stated that photography was among the major advances in the field at the time1. Since then, the importance of photographic standardization has been the target of numerous publications in the international2-5 and Brazilian6-11 literature. However, the teaching and learning of the photodocumentation process during residency has not been standardized in national peer-reviewed literature.
OBJECTIVE
The present study aims to outline a formal training program in 2-dimensional standardized photographic (“photo”) documentation adopted by a residency in Plastic Surgery.
METHODS
This is a descriptive study about the components of the training program in photodocumentation adopted by the Brazilian Society of Plastic Surgery (SBCP) Accredited Service. The structure (active participation in resident training) and topics covered during training included: design of a photo studio (equipment types and distribution of equipment), differences among different cameras and lenses, photographic principles (exposure [aperture, speed and ISO] and depth of field), lighting, photo situations in plastic surgery (preoperative, intraoperative, postoperative, and pediatric documentation), standardized photo views, photo database management, types of images, computerized photogrammetry, and ethical and medical-legal issues (including consent for photos).
This study followed the ethical standards of the 1964 Declaration of Helsinki and its respective amendments and was approved by the local Ethics Committee (003/2017).
RESULTS
Photographic documentation training program
In 2007, when the institutional photographic protocol was modified, a formal training program in standard 2-dimensional photodocumentation was implemented to formalize and stimulate this component of the training process in Plastic Surgery. The photographic protocol was standardized with the purpose of maintaining a complete medical image database for longitudinal documentation (pre- and post-operative periods, early and late) of all patients (diagnostic process, evolutionary and therapeutic results), preoperative planning, intraoperative visual reference, ethical and medical-legal issues, medical education (including training of new plastic surgeons) and scientific research (presentations and scientific articles).
As the patient must be the only (or principal) modifiable variable in photos taken at different times, we have focused our efforts on the careful standardization of photodocumentation; the goal is to present the patient accurately (including satisfactory and unsatisfactory results), rather than producing a favorable view, as is done, for example, in advertising photography. Thus, all patients have been systematically photographed in the preoperative, intraoperative, and postoperative periods by a team composed of a professional photographer contracted by the Institution, plastic surgeons/preceptors, and residents in Plastic Surgery.
In addition to standard photodocumentation (preoperative and postoperative [1st and 2nd weeks, 1st, 3rd, 6th, 9th, 12th postoperative months, and then every 3/6 months]), all additional complications were systematically photographed. The date was correctly stated (time, day, month, and year) on each patient’s photograph and records to follow the documentation and facilitate the active search for specific photos.
Regardless of professional documentation, plastic surgeons/preceptors also routinely take photos themselves; such a stance serves as an additional stimulus for training residents. Residents actively participate in all institutional photo systematization and acquire skills related to photodocumentation through the training program. Training has been distributed over the 3 years of the program, with a natural transition of tasks according to the year of training/acquisition of photo skills:
First-year residents (R1s): the institutional professional photographer is responsible for the initial teaching-learning process of the theoretical and practical principles of photography (detailed below) for residents who have just started training. As the skills are acquired and properly certified, the R1s begin to photograph outpatients under the supervision of the “most experienced residents” and surgeons/preceptors. In all particular situations requiring removal of clothing or exposure of sexual organs, the professional photographer does not participate in the photodocumentation, and the R1s are systematically guided by the more seasoned residents and surgeons/preceptors.
Second-year residents (R2s): participate in the photodocumentation of patients until the R1s acquire the necessary skills.
Third-year residents (R3s): perform photodocumentation in the surgical center (preoperative, intraoperative, and postoperative).
During and after all photo shoots, the professional photographer, surgeons/preceptors, and “more experienced” residents are responsible for reviewing the photos taken by “less experienced” residents in order to provide constructive feedback and maintain quality of the photos.
Moreover, during this process, all residents are encouraged to practice knowledge and skills related to photodocumentation (e.g., photographing outside the hospital setting) in order to expand and refine photodocumentation as well as strengthen the constructive feedback process (residents are encouraged to take their questions to the professional photographer, surgeons/preceptors, and more “experienced” residents).
Components of the training program
During the training process, topics/themes (detailed, from now on) were presented in theory classes (presentation of concepts) and practicums (exercises where the concepts were applied). The training resident was encouraged to learn all nuances of photodocumentation, seeking total control over the final quality of the photo.
Residents are trained in a white-walled room with curtained windows, equipped with a rotating chair (360°) for the patient, placed 30-90 cm from a blue background with carefully marked points to facilitate different photo views; digital cameras (Nikon® D50), lenses (AF Nikkor® 105 mm), flash units (Nikon® SB-21/AS-14 and Nikon® SB-26), and digital flash kits (Atek® 160 Plus) were provided. In addition to learning how to use all equipment, residents gain knowledge about the differences between supplied and commercially available equipment.
All current cameras operate as “dark cameras”: instead of a hole, they have a lens and diaphragm through which light passes and a light-sensitive material, i.e., the digital sensor, on the opposite side. The difference between the cameras lies in the sophistication and efficiency with which they perform (allowing controlled light to reach the sensor and produce an image). Some cameras have a direct viewfinder, and reflex cameras (single- or dual-lens), large format cameras (“studio cameras”), and monitor cameras (“compact digital cameras”) are also used.
Any shortcomings in the understanding and application of photographic concepts or the use of automatic controls in the photo process will allow the system to dictate the results, rather than residents having total control over their own standardized photos. Thus, digital single-lens reflex (DSLR) cameras are at the core of training, as they allow greater control over photo results including lens changes. In these DSLR cameras, the image shown on the liquid crystal display (LCD) is identical to the image that will appear on the photo (or computer monitor); the LCD allows immediate confirmation of the image quality: low-quality images can be retaken. It is important that residents know the camera’s main components/functions: shutter, shutter speed control, viewfinder, shutter release, slots for the lenses, flash, and cables.
The lens is the key component of photography because the definition and sharpness of the image projected are the determining factors of photo quality. The lenses function as a kind of “funnel” for the light beams, directing them in a convergent way. Lenses have 2 adjustments: focus (controlled by a focus ring; the resident must master the use of manual focus) and diaphragm aperture.
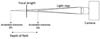
The brightness of an object depends on certain factors: the lens diameter, lens quality, and quantity, and lens focal length (the distance [in millimeters]) between the optical center of the lens and the focal plane when the subject [patient] is in focus). The sensor will receive more light with a lens of larger diameter and will receive less light with greater focal length and number of lenses.
Different types of lenses are defined according to focal length: normal, wide-angle, and telephoto (Figure 1). Like human eyes, normal lenses cover a 45°-50° angle of the scene (for example, the 50 mm lens covers approximately 46° of the scene). Wide-angle lenses have a smaller focal length and a larger coverage angle compared to normal lenses; with these wide-angle lenses, patients closer or farther seem respectively larger or smaller than in reality.
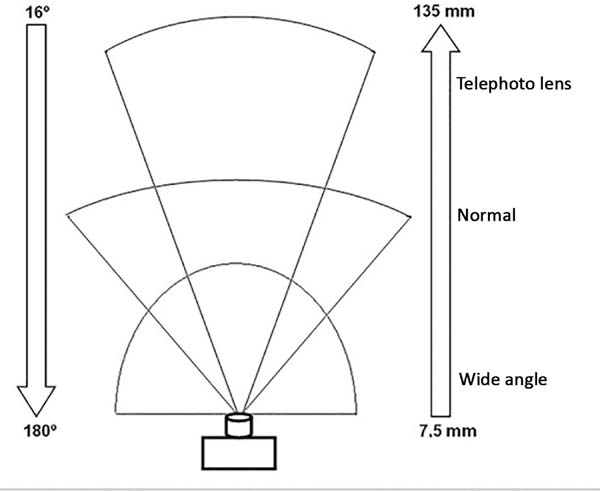
Telephoto lenses have a greater focal length and lower coverage angle when compared to normal lenses; hence, distant patients seem to be close to the camera. Zoom lenses have variable focal length. Residents should primarily master optical zoom, not digital zoom. However, the use of zoom lenses is not recommended for preoperative and postoperative documentation, as potential variation may compromise photo standardization.
Fixed lenses have been the most used, and must be chosen according to the need, to allow better photo standardization. For example, focal length lenses between 90 and 105 mm are recommended to capture pertinent facial anatomy as they provide greater depth of field, ensuring that the entire face is in focus. On the other hand, macro lenses are convenient for intraoperative photographs and documentation of skin lesions or scars as they enlarge the subject that is close to the camera.
Photographic principles2,4,12,14
Exposure: the relationships between the aperture (“amount of light”), shutter speed (“how much light will reach the digital sensor”), and ISO (sensitivity) are considered the “photo exposure triangle.” In contrast with automatic exposure, the 3 functions must be controlled/modified according to each particular situation via a selector/button on the camera body or on the lens itself (speed).
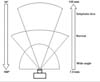
Aperture is defined by the diaphragm (“opening”) that controls the amount of light entering the lens. The diaphragm has several aperture values, symbolized by “f.” Increasing the “f” value reduces the orifice size (Figure 1). The aperture also affects the depth of field.
Speed indicates the time the shutter (located between the lens and the sensor, to control the time [speed with] light can enter the camera) is open, when the sensor will receive light. Speed values are defined in fractions (for example, 125 means that the sensor is exposed to light for 1/125 s). The smaller the number, the lower the speed at which the light will reach the sensor; speeds below 60-30 may require use of a tripod to prevent loss of photo quality (Figure 2).

ISO is the measure of sensitivity of the sensor to light. The higher the ISO number, the greater the sensitivity of the sensor and the greater the light pickup; however, the image may be affected by “noise,” with reduced photo quality.
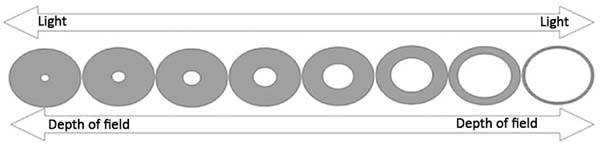
Depth of field is defined by the area before (anterior, front) and after (posterior, back) the patient/subject, in which the sharpness is acceptable (Figure 3). This is dependent on the aperture (Figure 2), and focal length of the lenses (telephoto lenses [e.g., 300 mm] have smaller field depths than normal lenses [e.g., 50 mm] with the same aperture).
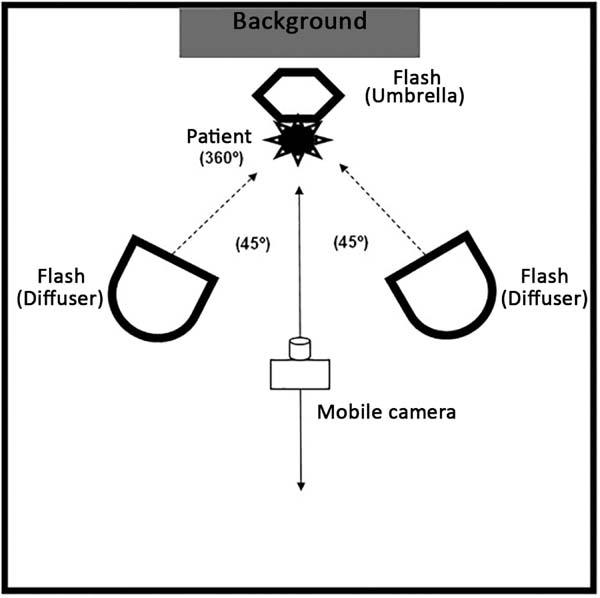
Mastering natural and artificial lighting is essential to take good quality photos. In a studio, lighting can be fully controlled (Figure 4). The flash is routinely used due to its power. The shutter (speed) must be synchronized with the flash, and only the aperture may be modified. Flashes are used with diffusers and reflectors (soft fabrics) to soften the shadows (balance the illumination). A circular flash used with a macro lens should be applied, especially when recording small subjects (e.g., scars and skin lesions) and cavities (e.g., oral cavity and tissue tunnels formed by dissection) to eliminate shadows and improve the photo result.
Preparation of patients3,5,14,15
All objects that may cause visual distraction should be systematically removed from the visual field prior to photodocumentation. The frontal region and ears should not be covered by hair. Glasses, jewelry, hearing aids, and makeup should be removed. All clothing that interferes with the visibility of target areas should be removed. As many patients may feel uncomfortable without clothing, and underwear can produce inconsistent photographs, disposable photo clothing can be used; it is important to maintain consistency of use when different photos are taken, for example, in the preoperative and postoperative periods.
Positioning of patients and the camera2-5,12,14-16
Proper positioning of the patient and the camera should be standardized according to the target anatomical region, to allow reproducibility with steady quality. For example, in the sitting position, the patient should be erect on a swivel seat, and the head should be flexed or extended up to the desired plane (e.g., Frankfurt horizontal plane, interpupillary plane, or vertical midline). Pre-placed markings on the walls and floor can guide proper positioning and assist precise rotation of the patient.
The axis formed between the camera lens and a specific anatomical point, and the distance between the camera and the patient, should also be standardized, and may vary according to the location in the photo. The lens axis should be at the same height as the center of the area to be photographed (Figure 5).

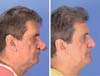
Photoshoot conditions 2-4,16-18
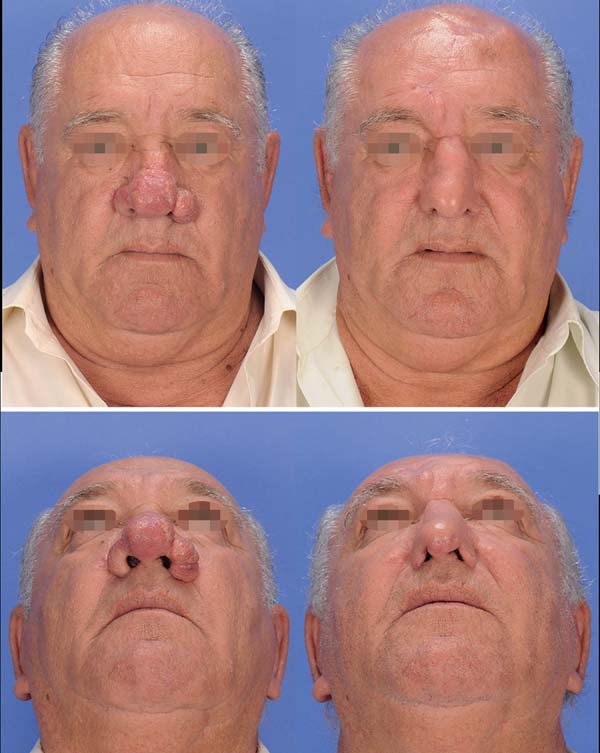
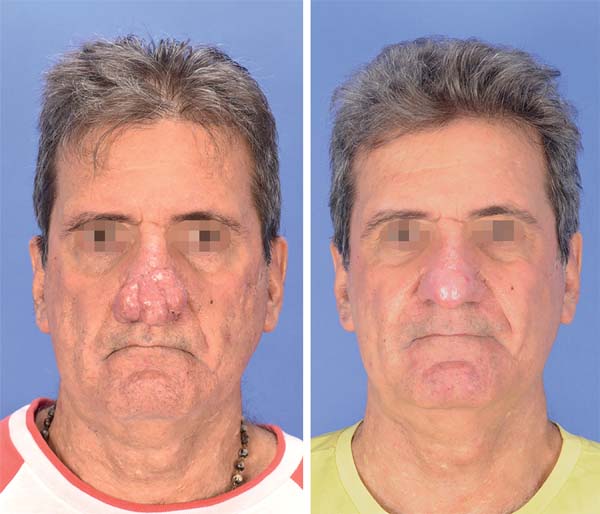
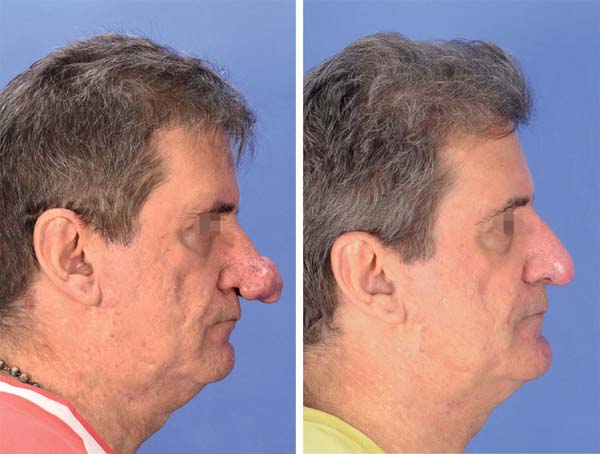
Preoperative and postoperative: In pre- and postoperative photography, the results are only comparable when the standardization (detailed, as noted above) is consistently reproduced. The same equipment with the same settings should be used in pre- and postoperative photos (Figures 6-8). With standardization, there may be differences in inter-individual comparisons (mainly children versus adults), but the intra-individual comparison is entirely feasible.

Intraoperative: It is important that any unnecessary objects (hands, surgical instruments, compresses, saliva, blood, etc.) are completely removed from the area being photographed. A blue (or green) background should be used wherever possible. DSLR cameras with macro, fixed lens, and circular flash are the most recommended for such documentation. The surgical light source must be turned off to avoid shadows that may affect color balance.
Pediatric patients: patients who do not yet sit or stand should preferably be photographed in their parents’ arms, being careful to wrap parents’ bodies with blue clothing while using a full blue background. It may be necessary to hold the child’s attention using noises or movements, to keep the head in designated position.
Movements (muscular action): Functional deficits and improvements may be documented; images during movement (for example, facial expression) are extremely useful in evaluating details of muscular action. For this purpose, numerous photos must be taken from the same point of view.
A set of standard photographic views (or poses) (frontal [or anteroposterior], bilateral profile [or lateral], and bilateral semi- profile [or oblique; 45°]) is used in most documentation, and supplementary views (including close-ups) should be photographed according to each specific anatomical region, type of deformity, and surgical intervention (Table 1). Anatomical points and limits must be carefully employed to maintain the standardization of photo views.
| Anatomical Regions/Surgical Procedures/Specific Deformities | Photographic views |
|---|---|
| Face (full) | Standard |
| Face (close up)* | Standard + B |
| Rhytidectomy | Standard + facial expression |
| Ears | Standard + PA + P(PA) + SM(PA) |
| Eyelids | Standard + periorbital expression |
| Mento/cervical ** | Standard + extension and cervical flexion |
| Breasts *** | Standard |
| Abdomen **** | Standard |
| Hands/fingers | Palmar, dorsal, and lateral views |
| Cleft lip and palate | Standard, AP' + B + intraoral |
| Maxillomandibular/occlusal deformities | Standard + AP' + P' + intraoral |
| Cranial deformities | Standard + SC |
Standard: AP, anteroposterior (frontal view); P, right and left profile (or lateral); and SM, right and left semi-profile (or oblique). Facial expression: frontal elevation, frontal contraction, nasal elevation, closing of the eyelids (relaxed and with effort), lip protrusion (beak or whistle), lip retrusion (smile). Intraoral: AP, bilateral lateral and maxillary and mandibular occlusions (with or without palate inclusion). Upper limit:
* eyebrows;
** lips;
*** clavicles;
**** inframammary grooves.
B, basal; PA, posteroanterior; P(PA), bilateral profile with PA view; SP(PA), semi profile with PA view; Lo, lateral oral bilateral ; AP', anteroposterior (frontal view) with smile, labial retractor and spatula in the occlusal plane; P', profile at rest and maximum intercuspation; SC, supracranial. Note: details of the specific views should be accessed in key references2-5,8,14-17,19-21.

Photo database 4,13,16,19,22-24
Given the nature of patient photos, we should be extremely cautious in the handling, storage, and use of all medical photodocumentation. It is important that the entire process involved in photo storage, file renaming (including the creation of a database that facilitates subsequent searches), and backup (files regularly recorded to a CD, DVD, or external hard drive) be executed judiciously and efficiently.
To do this, all photos stored on a digital camera memory card are transferred to a computer hard disk. The files must then be renamed, ensuring that each file has a unique name to avoid overwriting; file names should not exceed 31 characters in length to allow compatibility with different operating systems (PC, Mac, and Unix). The ultimate goal of renaming should be ease and reliability of access (search and retrieval) of target images. Existing keywords and practical renaming systems can be applied according to the need: for example, date (year/month/day) of the photo, medical record number, follow-up period (e.g., preop, postop 3 months, or postop 1 year), and file extension (e.g., jpg) - “2018.02.01_00123_preop.jpg” or “2018.02.01 (00123)(preop).jpg”.
Image formats4,13,16,17,19,22-25
Images can be transferred to the computer hard drive in a variety of file formats, with 2 types of recording systems: lossless and lossy (larger and smaller file sizes, respectively). In lossless formats such as TIF (tagged-image format), BMP (bitmap), PSD (Photoshop), and Macintosh PIC, the images are saved in their entirety, preserving all original information. On the other hand, in lossy formats (JPEG, Joint Photographic Experts Group), images are compressed into smaller files, eliminating some of the original image information each time the file is modified and saved, thus, degrading their quality.
The JPEG format is commonly used because it can be easily imported into word processing, presentation, and image manipulation programs. The TIF format has been the most commonly used in scientific publishing. Converting JPEG to TIFF in an image editor increases the size of the file but does not improve the image quality. Another available file format is RAW (known as “digital negative”). Unlike others, the actual information in the photo is completely transferred to the hard drive in RAW format. The RAW format contains detailed information (e.g., white balance, contrast mapping, and so on) and thus has the potential to produce better image quality due to minimal data manipulation.
As most current DSLR cameras offer the option of recording images as JPEG files, RAW files, or both, issues such as storage space (hard disk size) and willingness to process images should be considered when choosing formats.
Computerized photogrammetry6,7,14
Residents also learn about standardized, 2-dimensional computerized digital photogrammetry, a form of indirect anthropometry. In this part of training, measurements (linear, angular, and area) are performed on 2-dimensional digital photos using specific software (e.g., ImageJ, Adobe Photoshop, Mimics, among others). Thus, it is possible to objectively compare linear measurements between well-established anatomical points in the preoperative and postoperative periods. Acquiring this particular skill increases the scientific arsenal for residents who can then participate in scientific research projects that objectively evaluate surgical outcomes.
Ethical and medical-legal issues2,4,14-16,22,26,27
Medical photodocumentation is completely entangled in multidimensional ethical and medical-legal dilemmas. While standardized photodocumentation may assist the surgeon in possible medical-legal implications—if there is litigation involving a particular surgical treatment, the images may be applied as evidence—any “improper” use (including loss) of patient photos may end up having ethical and medical-legal implications. Therefore, all those involved with medical photodocumentation must meticulously ensure that patients are fully respected in order to maintain the essence of ethical and medical-legal principles in which the physician-patient relationship can be longitudinally structured.
Thus, prior to any photodocumentation, all patients or legal guardians (in case of being incapable) must systematically provide written photographic consent. Consent should be specifically provided for identifiable and non-identifiable photos, making clear all potential uses, including clinical information as part of the medical record, educational purposes, lectures, exhibitions, and scientific publications (books and articles). In addition to this basic information, it is critical that patients and family members understand other key elements: consent can be withdrawn at any time, and more importantly, once the photos are published (in periodicals, books, etc.), they enter the public domain and may be impossible to remove.
Since photos are part of the patient medical record, maximum safety must be guaranteed; the database must be password-protected and have limited access in order to prevent unauthorized use. Moreover, patients should be photographed only according to an institutional protocol, and photographing patients and archiving photos on personal cameras or cell phones should be avoided—there is even evidence in literature26 about patients preferring photos taken with hospital cameras. Although personal cell phones are readily available, their application in the medical environment has not yet been fully defined and there are examples in the literature of problems with the “simple” use of a cell phone camera.
Finally, residents should be trained in the informed consent process and recognition of patient/family concerns. Residents must master the laws that regulate medical practice (Code of Medical Ethics) and plastic surgery in Brazil. For example, patient photos cannot be applied to self-promotion or medical advertising, even with authorization (Medical Advertising Manual - CFM Resolution 1974/11).
DISCUSSION
Clinical-surgical experiences should be considered as critical factors in determining the success of resident education in Plastic Surgery28. Furthermore, mastering good quality standardized photodocumentation stands out among the many skills and tools that every plastic surgeon must acquire during training10.
The continuous growth and refinement of digital imagery undoubtedly enable an increase in use of medical photos in the academic environment, including pre- and postoperative evaluation, which has become the standard for the classification of results in plastic surgery29. However, we and other authors4,5,14,19,29,30 continue to see many photos in scientific publications and presentations that do not meet the criteria for pre- and postoperative quality or consistency.
These non-standardized photos can misrepresent the patient’s primary complaint, distort perceptions of surgical outcomes, and divert attention from those viewing the image2,9,29,30.
In the literature, Dr. Paul Tessier, the father of modern craniofacial surgery, took care to longitudinally photograph his patients, and is recognized, to this day for his incredible surgical results. The importance of documentation in plastic surgery is also reinforced among the principles (“Keep an Accurate Record”) described by Dr. Ralph Millard, a renowned plastic surgeon. We believe that acquisition of this skill by residents should be promoted by all those involved in the training process. Thus, we outlined a formal training program in standard 2-dimensional photodocumentation. The present study serves as a guide for the development of photo skills during training in Plastic Surgery, which preceptors and residents can apply to expand their understanding of detailed photo concepts.
The present training program was structured to develop photo skills during training in Plastic Surgery and therefore does not exhaust the subject. Additional photographic aspects should be reviewed in specific articles2-10,12-17,20,22.
CONCLUSION
Formal training in standardized 2-dimensional photodocumentation complements the arsenal of skills required for residents in Plastic Surgery, in order to better prepare them for future careers.
COLLABORATIONS
|
RF |
Final approval of the manuscript, conceptualization, design and draft of the study, methodology, performance of operations and/ or experiments, writing - preparation of the original, writing - review and editing. |
|
AS |
Final approval of the manuscript, data collection. |
|
EG |
Final approval of the manuscript, data collection, writing - review and editing. |
|
CLB |
Final approval of the manuscript, data collection, writing - review and editing. |
|
CARA |
Final approval of the manuscript, data collection, writing - review and editing. |
|
CERA |
Final approval of the manuscript, conceptualization, design and draft of the study, methodology, performance of operations and/ or experiments, writing - review and editing. |
REFERENCES
1. Guy C, Guy RJ, Zook EG. Standards of photography (Discussion). Plast Reconstr Surg. 1984;74(1):145-6.
2. Archibald DJ, Carlson ML, Friedman O. Pitfalls of nonstandardized photography. Facial Plast Surg Clin North Am. 2010;18(2):253-66.
3. Persichetti P, Simone P, Langella M, Marangi GF, Carusi C. Digital photography in plastic surgery: how to achieve reasonable standardization outside a photographic studio. Aesthetic Plast Surg. 2007;31(2):194-200.
4. Ettorre G, Weber M, Schaaf H, Lowry JC, Mommaerts MY, Howaldt HP. Standards for digital photography in cranio-maxillo-facial surgery - Part I: Basic views and guidelines. J Craniomaxillofac Surg. 2006;34(2):65-73.
5. Yavuzer R, Smirnes S, Jackson IT. Guidelines for standard photography in plastic surgery. Ann Plast Surg. 2001;46(3):293-300.
6. Quieregatto PR, Hochman B, Furtado F, Machado AF, Sabino Neto M, Ferreira LM. Image analysis software versus direct anthropometry for breast measurements. Acta Cir Bras. 2014;29(10):688-95.
7. Hochman B, Castilho HT, Ferreira LM. Padronização fotográfica e morfométrica na fotogrametria computadorizada do nariz. Acta Cir Bras. 2002;17(4):258-66.
8. Hochman B, Nahas FX, Ferreira LM. Photography in medical research. Acta Cir Bras. 2005;20(Suppl 2):19-25.
9. Paccanaro RC, Gragnani A, Calil JA, Secco LG, Miranda RE, Bersou G, et al. Padronização e avaliação fotográfica em cirurgia periorbital. Rev Bras Cir Plást. 2010;25(2):278-84.
10. Scomação IR, Graf RM, Maluf I Jr, Forte AJ, da Silva Freitas R. Evaluation of Photographic Variables in Patients with Indication for Facial Rejuvenation. Aesthetic Plast Surg. 2013;37(6):1114-9.
11. Raposo-Amaral CE, Raposo-Amaral CA. Changing face of cleft care: specialized centers in developing countries. J Craniofac Surg. 2012;23(1):206-9.
12. Soto-Medina CA, Guerrerosantos J, de la Torre-Guerrerosantos Y. Fotografía digital: una guía sencilla de actualización. Cir Plást Iberolatinoam. 2014;40(1):29-37.
13. Peck JJ, Roofe SB, Kawasaki DK. Camera and lens selection for the facial plastic surgeon. Facial Plast Surg Clin North Am. 2010;18(2):223-30.
14. Quieregatto PR, Hochman B, Furtado F, Ferrara SF, Machado AF, Sabino Neto M, et al. Photographs for anthropometric measurements of the breast region. Are there limitations? Acta Cir Bras. 2015;30(7):509-16.
15. Swamy RS, Most SP. Pre- and postoperative portrait photography: standardized photos for various procedures. Facial Plast Surg Clin North Am. 2010;18(2):245-52.
16. Schaaf H, Streckbein P, Ettorre G, Lowry JC, Mommaerts MY, Howaldt HP. Standards for digital photography in cranio-maxillo-facial surgery--Part II: Additional picture sets and avoiding common mistakes. J Craniomaxillofac Surg. 2006;34(7):444-55.
17. Santo PRQE, Sabino Neto M, Furtado F, Trigo Junior TW, Santo AAQE, Nonato FL, et al. Conhecendo os tipos de arquivo de fotografia JPEG e RAW utilizados em pesquisa. Rev Bras Cir Plást. 2018;33(1):89-95.
18. Humphrey CD, Kriet JD. Intraoperative photography. Facial Plast Surg Clin North Am. 2010;18(2):329-34.
19. Solesio Pilarte F, Lorda Barraguer E, Lorda Barraguer A, Laredo Ortiz C, Rubio Verdú R. Estandarización fotográfica en Cirugía Plástica y Estética. Cir Plást Iberolatinoam. 2009;35(2):79-90.
20. Henderson JL, Larrabee WF Jr, Krieger BD. Photographic standards for facial plastic surgery. Arch Facial Plast Surg. 2005;7(5):331-3.
21. Gherardini G, Matarasso A, Serure AS, Toledo LS, DiBernardo BE. Standardization in photography for body contour surgery and suction-assisted lipectomy. Plast Reconstr Surg. 1997;100(1):227-37.
22. Segal J, Sacopulos MJ. Photography consent and related legal issues. Facial Plast Surg Clin North Am. 2010;18(2):237-44.
23. Humphrey CD, Tollefson TT, Kriet JD. Digital asset management. Facial Plast Surg Clin North Am. 2010;18(2):335-40.
24. Hamilton GS 3rd. Photoshop tips and tricks every facial plastic surgeon should know. Facial Plast Surg Clin North Am. 2010;18(2):283-328.
25. Pham AM, Tollefson TT. Objective facial photograph analysis using imaging software. Facial Plast Surg Clin North Am. 2010;18(2):341-9.
26. Lau CK, Schumacher HH, Irwin MS. Patients' perception of medical photography. J Plast Reconstr Aesthet Surg. 2010;63(6):e507-11.
27. Carreiro PR. Ethics in the digital age. Rev Col Bras Cir. 2014;41(4):234-5.
28. Denadai R, Muraro CAS, Raposo-do-Amaral CE. Cirurgiões plásticos como cirurgiões de mão: a visão dos residentes. Rev Bras Cir Plást. 2014;29(3):422-31.
29. Parker WL, Czerwinski M, Sinno H, Loizides P, Lee C. Objective interpretation of surgical outcomes: is there a need for standardizing digital images in the plastic surgery literature? Plast Reconstr Surg. 2007;120(5):1419-23.
30. Riml S, Piontke AT, Larcher L, Kompatscher P. Widespread disregard of photographic documentation standards in plastic surgery: a brief survey. Plast Reconstr Surg. 2010;126(5):274e-6e.
1. Hospital SOBRAPAR, Instituto de Cirurgia
Plástica Craniofacial, Campinas, SP, Brazil.
2. Faculdade de Ciências Médicas, Universidade
Estadual de Campinas, Campinas, SP, Brazil.
Corresponding author: Rafael Denadai, Av. Adolpho Lutz, 100 - Cidade Universitária - Campinas, SP, Brazil, Zip Code 13083-880. E-mail: denadai.rafael@hotmail.com
Article received: May 23, 2018.
Article accepted: October 4, 2018.
Conflicts of interest: none.
 Read in Portuguese
 Read in English
 PDF PT
 Print
Print
 Send this article by email
 How to Cite
 Mendeley
 Pocket